

To add live chat to your website, sign up for a live chat tool, copy its embed code, and paste it into your site’s footer just before the closing </body> tag, or install the tool’s plugin for WordPress or Shopify. Then set your chat hours, test on desktop and mobile, and publish.
Most installs take a few minutes. The steps below cover where the code goes on each major website builder, and the checks that decide whether chat helps or hurts: page speed, cookie consent, security headers, mobile layout, and accessibility. If you are still choosing a tool, start with what live chat software is and what it costs or our best live chat software guide.
Add the code in one place that covers every page, never in two places at once, and test a real chat on a phone before you announce it.
Compare live chat tools →What you need before you add live chat
You need four things: an account with a live chat tool, admin access to your website or its builder, a decision on who answers chats and when, and a check of your cookie banner and security settings. The code itself is usually one short snippet.
- A live chat tool. Free options exist. tawk.to gives its live chat away (tawk.to pricing), and HubSpot offers free live chat with a chatbot builder (HubSpot). Paid tools add routing, AI, and reporting.
- Admin access to your site. You need to edit the site-wide footer, install a plugin or app, or publish a tag in Google Tag Manager.
- Someone to answer. Decide your chat hours and who covers them before the widget goes live. A bubble nobody answers is worse than no bubble.
- Your cookie and security setup. Know whether your site uses a cookie consent tool or a Content Security Policy, because both can stop the widget from loading.
How to add live chat to your website in 6 steps
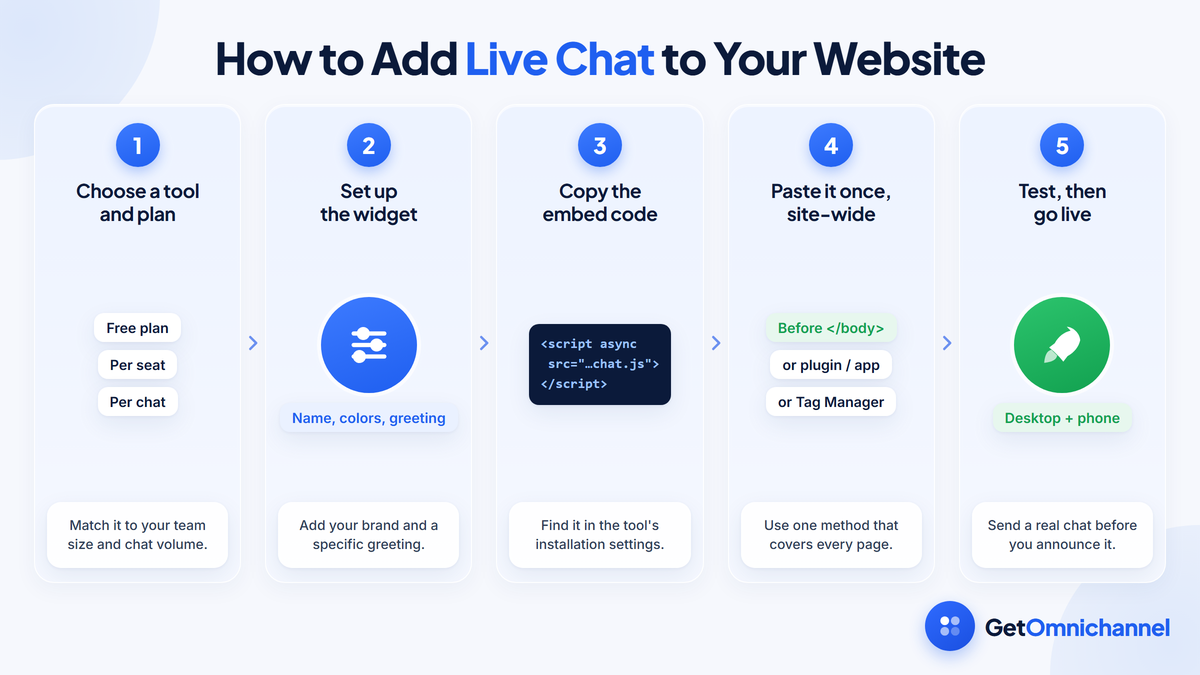
Choose a tool, set up the widget, copy the embed code, add it to every page in one place, set hours and routing, and test before you go live. Each step is below, followed by platform-specific instructions.
Choose a live chat tool and plan
Match the tool to your team size and chat volume. Per-seat, per-conversation, and free plans behave very differently as you grow. Our live chat software guide covers the pricing models.
Set up the widget
In the tool's settings, add your company name, colors, and a short greeting. Keep the greeting specific, such as "Questions about sizing or shipping? We reply in a few minutes."
Copy the embed code
Find the installation or widget code section in the tool's dashboard and copy the snippet. Many tools also list a plugin or app for your platform, which saves you pasting code.
Add the code once, site-wide
Paste the snippet into a field that applies to every page, usually the footer code area just before </body>, or use the vendor's plugin, app, or a tag manager. Use one method only, or you may load two widgets.
Set hours, routing, and the offline form
Turn on business hours, send chats to the right person or team, and switch the widget to an offline message form when nobody is available.
Test, then go live
Send a real test chat from a phone and a laptop, check that it reaches the agent app, and run the launch checklist further down this page.
Pick one installation method and write it down. Most "chat appears twice" or "chat disappeared" problems come from a plugin, a theme edit, and a tag manager all trying to load the same widget.
Where to paste live chat code on each platform
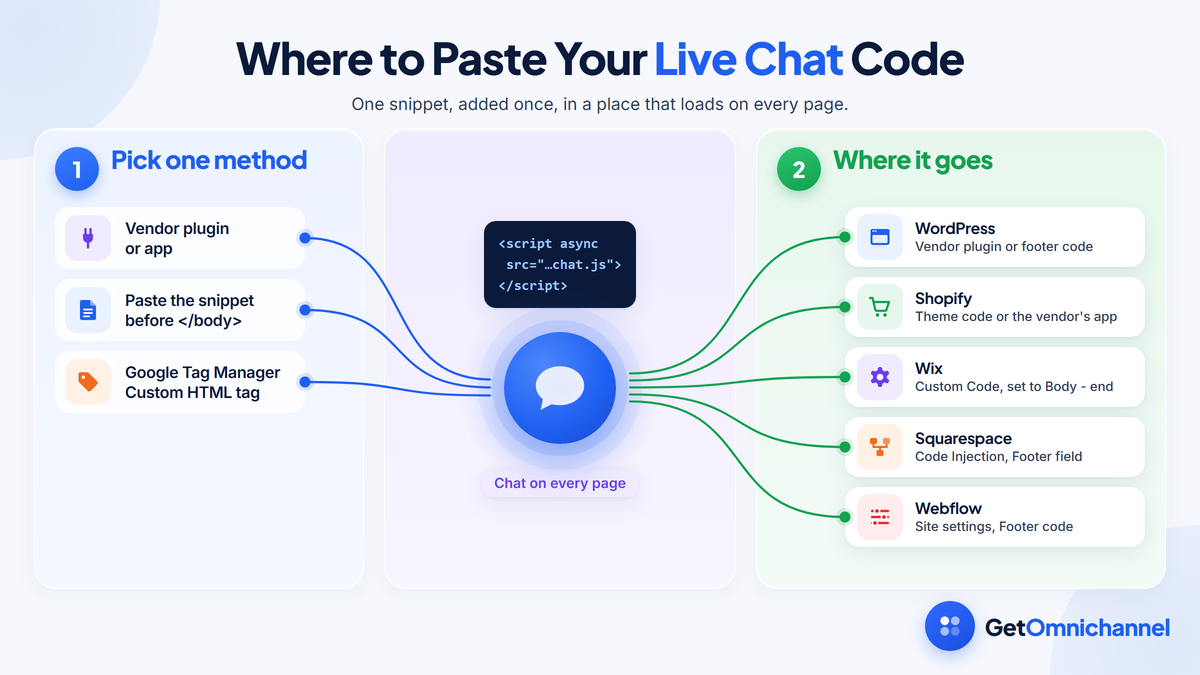
On most website builders, the chat code goes in a site-wide footer or custom code setting, not on individual pages. WordPress and Shopify also support vendor plugins and apps, and Google Tag Manager can add the code without touching your site’s templates.
| Platform | Where to add it | Notes |
|---|---|---|
| WordPress | The chat vendor's plugin, or a footer code area in your theme or a header-and-footer plugin | A vendor plugin is easiest; tawk.to's plugin lists 100,000+ active installations |
| Shopify | Online Store, then the theme menu, then Edit code; or the vendor's Shopify app | Shopify advises duplicating your theme first as a backup |
| Wix | Settings, then Custom Code, then Add Custom Code, set to all pages and "Body - end" | Wix requires a published site with a connected domain |
| Squarespace | Code Injection, Footer field | Available on Core, Plus, Advanced, and some legacy plans |
| Webflow | Site settings, then Custom code, then the Footer code field | Applies to every page; publish the site after saving |
| Plain HTML | Before </body> in your shared footer template | If there is no shared footer, every page needs the code |
| Google Tag Manager | A Custom HTML tag with a page view trigger on all pages | Don't also install the code another way |
WordPress
The simplest route is the chat vendor’s own plugin. For example, the tawk.to plugin is installed from the WordPress plugin directory, then you open its settings, log in to your tawk.to account, and select a widget (WordPress.org). If your vendor has no plugin, paste the snippet into your theme’s footer area or a header-and-footer code plugin, and avoid editing theme files directly, because theme updates can overwrite them.
Shopify
Many chat tools offer a Shopify app, which installs without code. To paste code instead, go to Online Store, open the theme menu, and choose Edit code. Shopify recommends you “duplicate your theme to create a backup copy” before editing (Shopify Help Center). The snippet usually goes just before </body> in the main layout file.
Wix
In your site’s dashboard, open Settings, choose Custom Code, then Add Custom Code. Paste the snippet, apply it to all pages, and set the placement to “Body – end”. Wix notes your site must be published with a connected domain (Wix Help Center).
Squarespace
Open Code Injection and paste the snippet in the Footer field, which Squarespace says is “injected before the closing </body> tag on every page”. Code injection is available on the Core, Plus, Advanced, and some legacy plans (Squarespace Help).
Webflow
Open your site settings, go to the Custom code section, and paste the snippet in the footer area so it loads before </body> on every page (Webflow University). Publish the site after saving so the change goes live.
Google Tag Manager
In Tag Manager, create a new tag, choose Custom HTML, and paste the vendor’s code. Google notes you should “always place JavaScript inside <script></script> HTML tags” (Google). Add a page view trigger without conditions so it fires on every page, then publish the container (Google). Tag Manager suits teams that already manage marketing tags there.
Will live chat slow down your website?
A chat widget adds a third-party script, so it can slow your pages if it loads in the wrong way. Load it asynchronously, load it only once, and compare page speed before and after the install.
web.dev’s guidance is that “you should always load third-party scripts asynchronously” (web.dev). On a script tag, the async attribute lets the script download while the page keeps loading, and defer runs it after the page has been parsed (MDN Web Docs). Most vendor snippets already load this way, but check before you paste.
- Measure first. Run a key page through PageSpeed Insights before and after adding chat, so you know the real cost.
- Load it once. A plugin plus a tag manager plus a theme edit loads the same script two or three times.
- Show it where it matters. If your tool lets you choose pages, start with pricing, product, checkout, and help pages.
Cookies, consent, and privacy
Chat widgets often store cookies or similar data to remember a visitor’s conversation. Find out what your widget stores, list it in your cookie policy, and decide whether it needs consent before it loads.
In the UK, the ICO’s guidance says you must “get the person’s consent to store a cookie on their device,” unless the cookie is “strictly necessary” to provide a service the user requested (ICO). Whether a chat widget’s cookies count as strictly necessary depends on what they do, so ask your vendor for its cookie list and check with whoever owns privacy for your site.
If you manage consent in Google Tag Manager, each web container includes a “Consent Initialization – All Pages” trigger for consent tools that need to run first (Google). Also decide what the pre-chat form asks for: collect only the details you need, such as an email for follow-up.
If the widget doesn’t load: Content Security Policy
If your site sends a Content Security Policy, the browser blocks scripts from domains the policy doesn’t allow, so the chat widget can silently fail to appear. Add the vendor’s domains to the policy.
The CSP script-src directive “specifies valid sources for JavaScript” (MDN Web Docs). A chat widget usually also loads styles, images, and a live connection from the vendor, so it may need entries in other directives too. Ask your vendor for its list of domains, and check the browser console: a blocked widget shows a CSP error there.
Make the widget work on mobile and for keyboard users
On phones, the chat bubble must not cover buttons such as add to cart or checkout. For keyboard users, an open chat window must not hide the element they are focused on. Test both before launch.
WCAG 2.2 success criterion 2.4.11 (Level AA) requires that when a component receives keyboard focus, it “is not entirely hidden due to author-created content.” The W3C’s own examples include a chat window that covers a focused link, and note that a chat can pass by pushing content aside or opening into empty space (W3C).
- Check the bubble position on a phone. Move it, or adjust its offset in the widget settings, if it sits over a sticky cart bar, cookie banner, or back-to-top button.
- Tab through the page. You should be able to reach the chat button with the keyboard, open it, and close it again with Escape.
- Keep proactive pop-ups gentle. An invitation that opens the full chat window on load blocks the page on small screens.
Live chat launch checklist
Before you announce chat, confirm it appears on the right pages, a test message reaches an agent on desktop and phone, the offline form works, there is only one widget, and the bubble doesn’t block buttons or keyboard focus.
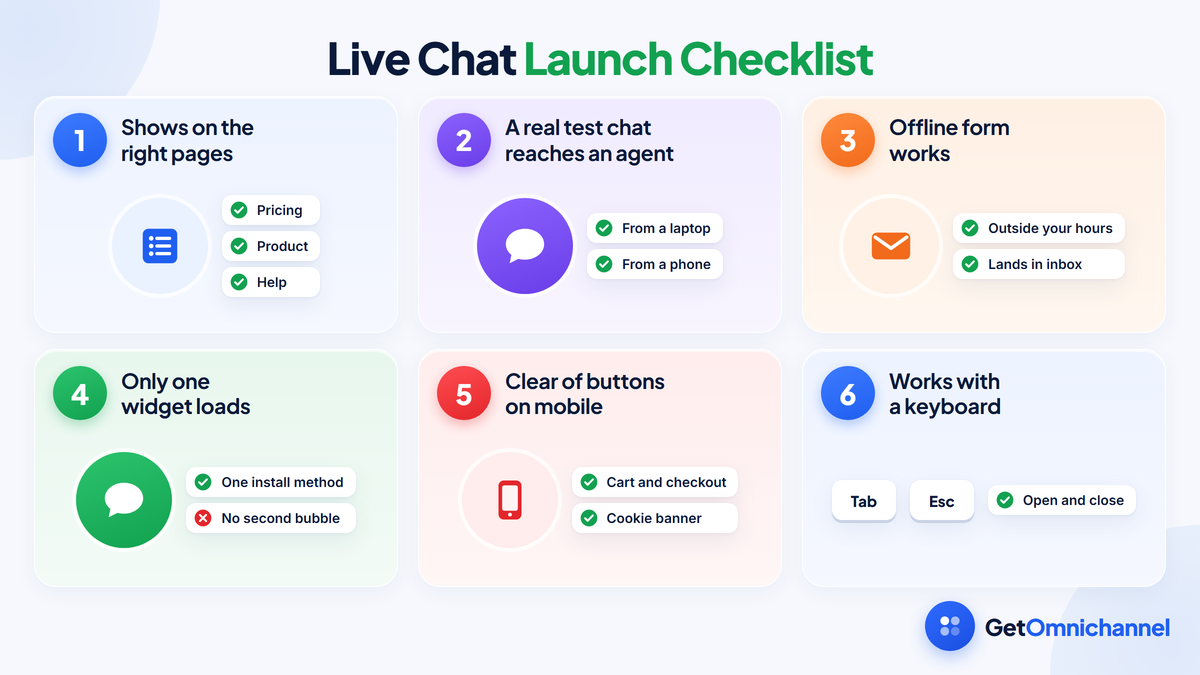
- Right pages: the widget shows on the pages you chose, including checkout if you want it there.
- Real test chat: a message from a phone and a laptop reaches the agent app, and the reply comes back.
- Offline form: outside your hours, the widget switches to a form that lands in your inbox or helpdesk.
- One widget: only one bubble appears, and the script loads once.
- Mobile layout: the bubble doesn’t cover cart, checkout, or cookie banner buttons.
- Keyboard: you can Tab to the chat button, open it, and close it with Escape.
- Speed: page speed after the install is close to the before number.
Live chat not showing? Common problems and fixes
| Problem | Likely cause | Fix |
|---|---|---|
| Widget doesn't appear | Code not saved or site not published; caching plugin; CSP block; ad blocker | Publish the site, clear the cache, check the browser console, and test in a private window without extensions |
| Two chat bubbles | Installed by two methods, such as a plugin and Google Tag Manager | Remove all but one installation method |
| Widget on some pages only | Code added to a single page or one template | Move the code to the site-wide footer or custom code setting |
| Chats don't reach agents | Agents offline, notifications off, or routing to an empty team | Check agent status, app notifications, and routing rules |
| Bubble covers buttons on mobile | Default position conflicts with sticky elements | Change the position or offset in widget settings |
| Pages feel slower | Script loads more than once or blocks rendering | Remove duplicates and confirm the snippet loads asynchronously |
Once chat is live, the work shifts to answering well. Our guide to live chat support best practices covers queues, transfers, and the metrics to track.
How this guide was made
Researched and written by Kinjal Trivedi, SaaS & Technology Writer at GetOmnichannel. Platform steps come from each platform's own help pages (WordPress.org, Shopify, Wix, Squarespace, Webflow, and Google Tag Manager), script-loading guidance from web.dev and MDN Web Docs, security details from MDN, cookie guidance from the UK ICO, and accessibility requirements from the W3C, all linked at each claim and checked in October 2026. Menu names change often, so follow your platform's current help page if a label differs. The checklist and troubleshooting table are editorial guidance, not test results, and we did not test the products named here.
Adding live chat is a short job: copy one snippet and add it once, in a place that covers every page, or use your vendor's plugin or app. The checks around it matter more. Load the script asynchronously, sort out cookies and security headers, keep the bubble clear of buttons and keyboard focus, and send a real test chat from a phone before you go live.
Frequently asked questions
Conclusion: one snippet, installed once, tested on a phone
Every website builder has a place for site-wide code, and most chat tools offer a plugin or app for the biggest platforms, so the install itself rarely takes long. What separates a good launch from a bad one is everything around the code: one install method, asynchronous loading, a cookie and security check, and a widget that stays out of the way on small screens.
Run the launch checklist, send a real test chat, and only then add chat to more pages.
Next step: If you haven’t chosen a tool yet, compare features, free plans, and pricing in our guide to the best live chat software.
 Your information is encrypted and kept secure.